Views: 0 Author: Site Editor Publish Time: 2025-08-27 Origin: Site
Are you tired of your old door handle or just looking to upgrade your space? Replacing or installing a new door handle is a simple and cost-effective way to refresh your door’s look and enhance security. In this post, we’ll walk you through the step-by-step process, from the tools you’ll need to helpful tips and common troubleshooting to make the job easier.
Before getting started on installing a door handle, it's important to gather the right tools and materials. Having everything you need at hand will make the process smoother and quicker.
Screwdrivers (flathead and Phillips): These are essential for loosening or tightening screws. You'll typically need both types for different fasteners in the handle set.
Tape measure: A tape measure ensures you install the handle in the correct position, especially when you’re measuring the backset for latch alignment.
Chisel (optional): If your new latch or handle doesn’t fit the existing hole perfectly, a chisel can help you adjust the door frame.
Drill (optional): If you need to make new holes for the handle or latch, a drill will be your go-to tool. It’s not always necessary but can come in handy for custom fits.
Hammer (optional): A hammer may be needed to gently tap parts into place or adjust parts like the latch or decorative plates.
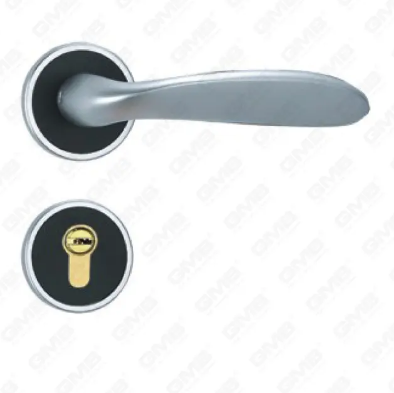
New door handle set: This will include the exterior and interior handles, as well as the spindle. Depending on the style you choose, it could be a lever or knob style, with various finishes to match your door and home décor.
New latch plate (if replacing): If your old latch plate is damaged or doesn’t align well with your new handle, make sure to get a new one. It helps the latch function smoothly.
Screws and fasteners: These are included with most handle sets. Make sure they’re the right size for the hardware you’ve chosen. If not, it’s best to pick up some matching screws from a local hardware store.
Decorative plates (if applicable): If your new door handle includes decorative plates or cover plates, make sure to have them ready. They hide the screws and give your door a finished, polished look.
Having the right tools and materials not only makes the installation easier but ensures everything fits properly and functions as it should. Whether you’re upgrading to a stylish new door handle or installing a durable padlock for added security, getting the right products from a reliable supplier, like the ones offered on GMB's website, is key for a successful installation.
Installing a door handle is a manageable DIY project that can improve the look and functionality of your door. Follow these simple steps to install a door handle correctly.
How do you safely remove an old door handle?
Lock the door in the open position: Keep the door halfway open and secure it with a wedge or spacer to prevent it from moving.
Use a flat-bladed screwdriver: Look for a small slot near the base of the handle. Insert the screwdriver and gently press to release the handle’s mechanism.
Remove screws and fasteners: Unscrew any visible screws or fasteners holding the handle and plates.
Take out the handle, latch, and plates: Once the screws are removed, carefully take off the handle, latch, and any decorative plates.
Tip: How to deal with hidden screws or fasteners under a decorative plate
If your handle has hidden screws beneath a decorative plate, use a flathead screwdriver to gently pry the plate off. Some handles might have screws under a small cover that can be carefully popped out.
How do you measure for a new door handle?
Measure from the edge of the door to the center of the hole: This is the backset measurement. Most handles use either a 60mm or 70mm backset.
Choose a handle that matches the existing hole dimensions: Make sure the new handle fits the hole size and backset of your door.
How to create new holes in the door (if necessary)?
Mark the correct hole locations: If the new handle requires a different hole placement, mark where the new holes need to go.
Drill the holes: Use a drill to create the new holes, making sure they align with your measurements.
How to install the latch plate and locking mechanism?
Insert the latch: Position the latch in the hole of the door edge, ensuring it faces the direction of the strike plate.
Secure the latch plate: Fasten the latch plate into place using the screws provided.
Test the latch: Before proceeding, check if the latch moves smoothly in and out to ensure proper alignment.
How do you install the new exterior handle?
Thread the spindle through the latch: Place the long spindle through the latch mechanism.
Align and secure the exterior handle: Attach the exterior handle, ensuring it aligns correctly with the spindle. Tighten the screws to hold it in place.
How to install the interior handle?
Slide the interior handle onto the spindle: Align the interior handle with the spindle and press it into place.
Secure the interior handle: Use the screws to secure the interior handle firmly.
Tip: How to ensure both handles align properly
Make sure both handles align perfectly by checking the position before tightening the screws fully. Both sides should sit flush with the door.
Why should you install decorative plates?
Decorative plates are not only aesthetically pleasing but also cover the screws, giving the door a clean, polished look.
How do you install the plates correctly?
Ensure the plates click into place: Press the decorative plates against the door until they securely snap in.
Secure with screws if necessary: If the plates require screws, fasten them tightly.
How do you check that the new handle is working correctly?
Test the handle and latch operation: Turn the handle to see if the latch extends and retracts smoothly.
Adjust the strike plate: Ensure the latch aligns properly with the strike plate to prevent it from catching.
Check for any misalignment or loose screws: Tighten any loose screws and make adjustments if needed for smooth operation.
Sometimes, things don’t go as smoothly as planned when installing a door handle. If you run into issues, don’t worry! Here are some common problems you might face, and how to fix them.
If the handles aren’t lining up or sitting straight, it’s likely an issue with the latch or strike plate positioning.
Adjust the strike plate or latch for proper fit: Check if the latch is aligned correctly. If it’s too high or low, loosen the screws and move it slightly. Ensure the latch is centered in the strike plate for smooth operation.
Check the door handles: If the handles are misaligned, loosen the screws and reposition them carefully. Tighten everything once they’re in the right place.
A sticking latch can prevent the door from locking or closing properly. Here’s what you can do:
Lubrication tips: Use a dry lubricant, such as graphite powder or silicone spray, on the latch mechanism. Apply a small amount to the latch and work it back and forth.
Adjust the strike plate: If lubrication doesn’t work, try adjusting the position of the strike plate. It might need to move slightly to align properly with the latch.
Sometimes, the screw holes on your new handle won’t align perfectly with the old ones. Here’s how to handle it:
Using a chisel or filler: If the screw holes are misaligned, you can carefully use a chisel to make the holes larger or adjust their position. For filling old screw holes, use wood filler. Once it’s dry, sand it smooth and drill new holes in the right spot.
Re-drill holes if necessary: If the holes are too far off, re-drill new holes, making sure they align with the new hardware.
By following these tips, you can easily fix alignment issues, sticking latches, and misaligned screw holes, making your door handle installation hassle-free.
When installing a new door handle, the right choice can make a big difference in both function and style. Here are a few things to consider before you dive into your project.
Understanding handle styles: The first decision is what type of handle you want. The three main styles are:
Lever handles: These are easy to use, especially on doors that need to be opened frequently, like bathroom or bedroom doors.
Knobs: Classic and stylish, knobs are commonly used for interior doors and add a more traditional look.
Smart handles: These are a modern choice that often integrates with home automation systems. Smart handles can offer keyless entry and enhanced security features.
Matching the handle with your door’s style and function: Consider what the door is used for. For example, privacy handles are ideal for bathrooms or bedrooms, while passage handles work best for hallways or closets where locking isn’t needed. Think about both style and purpose when making your choice.
If you’re replacing the door handle, it’s a good idea to check the condition of your existing lock. Replacing the lock at the same time as the handle offers several benefits:
Benefits of upgrading to a smart lock or high-security lock: A smart lock enhances convenience and security. If you're looking for more advanced features, a smart lock could allow keyless entry via Bluetooth, Wi-Fi, or even facial recognition. High-security locks are also an excellent choice if you’re concerned about safety, as they offer added protection against tampering and break-ins.
Ensuring compatibility with the backset and hole diameter: Before purchasing a new handle, make sure it matches your door’s specifications. Measure the backset (the distance from the edge of the door to the center of the hole) and ensure the handle fits within the existing hole size.
Matching finishes and colors for a cohesive look: The finish of your new handle should complement the rest of your hardware, such as the hinges, locks, and even the door frame. Whether you prefer a sleek modern look or a more traditional style, matching finishes like brushed nickel, chrome, or oil-rubbed bronze can create a cohesive, polished appearance.
Choosing the right handle, ensuring compatibility with your door, and considering security upgrades can make your door handle installation project much more satisfying and effective.
A: Yes, replacing a door handle is a simple and safe DIY project. All you need is a few basic tools and a bit of time.
A: No, you need to ensure the backset and hole size match the handle you choose. Measure the existing hole size before purchasing a new handle.
A: Look for hidden screws under the decorative plates or use a flathead screwdriver to gently pry them out.
A: If the holes don’t match, use wood filler to fill the old holes, re-drill new ones, or choose a handle with the correct size.
A: Typically, it takes 30-60 minutes depending on the complexity and your experience level.
A: Yes, the installation process is similar, but you may need additional components like a keypad or Wi-Fi module for smart locks.
Installing a door handle is a great DIY project. It’s cost-effective, quick, and improves both function and style. For long-lasting results, regularly tighten screws. Check the handle for smooth operation to ensure it works properly.
Tel: +86-510-8271 7656
Fax: +86-510-8271 7655
Email: info@gmbsino.com
Address: 4FL, No.503-1 Nanhu Road,
Sensing Device Industrial Park,
Liangxi District,Wuxi, Jiangsu,
China 214024